ThStream is website for each and every problem. Blogging, tips, marketing, seo etc

Responsive Ads Here
Showing posts with label WPBeginner. Show all posts

What’s the Difference Between Landing page vs Website?

Do you want to learn the difference between landing page vs website?

Many small businesses wonder whether they should make a landing page or a full-fledged website to showcase their online presence.

In this article, we’ll show you the difference between landing page vs website and which one you should make for your business.
Landing page vs website - what is the difference

What is a Landing Page?

A landing page is a stand-alone web page designed for a specific purpose and goal. It is a highly versatile tool that can be used in marketing, advertising, and lead generation campaigns.

It can also be used as a coming soon website for a business, a single-page website on its own, a product sales page, and more.

Landing page example

Landing pages are specifically designed for higher conversions. They have unique design characteristics that make it easier for users to perform the desired action.

This action could be signing up for an email list, purchasing a product, filling out a form, and more. These actions are referred to as ‘Call to action’.

Overall, the goal of landing pages is to minimize distractions that could take users away, and provide them with all the information they need to take action.

A landing page could also be a stand-alone website on its own with different sections all leading to one clear call to action.

A landing page website

What is a Website?

A website is a collection of different landing pages and sections to help your users find what they’re looking for.

For instance, a typical business website can have an about section, a separate blog page, a contact us page, products and services pages, and more.

There are many different types of websites and they can all have different pages for different features.

How a Website Differs from a Landing Page?

Unlike a landing page, a website can have multiple pages of information with different goals and purposes.

Not each page on a website is as highly focused on conversions as a landing page.

For instance, a business website may want users to get information about all the products and services they are offering. It may also give users multiple calls to action to choose from (e.g. make a purchase, ask for quote, join email list, follow on social media, and more).

Different types of websites would have different goals and a website gives them more ways to engage the audience.

A website could also be supported by multiple landing pages for their marketing campaigns.

For instance, a membership website may utilize a landing page for a subscription plan or an eCommerce store may want to create a pre-launch landing page for an upcoming product.

Landing page vs Website – Which One to Choose?

Many beginners struggle to decide between landing page vs website and which one to choose?

The answer lies in your own requirements and what you want to achieve for your business.

If you want to quickly launch a product, create an online presence for your business, capture potential leads and customers, then a landing page would be an easy way to go.

Example of a quick landing page

On the other hand, if you want to create a multi-page online presence for your business, use an eCommerce cart, sell online courses, start a blog, and more, then you will be better off with a website.
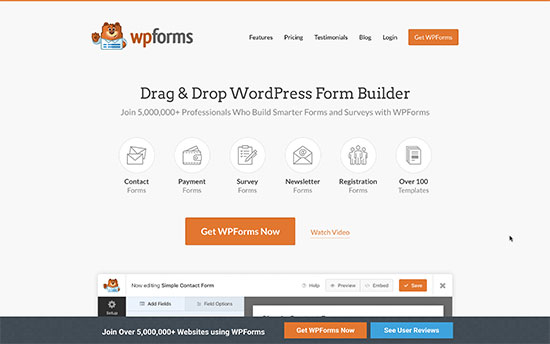
WPForms Website example

Remember you can always choose to create a landing page as a single-page website. You can also convert your landing page to a full-fledged website as your business grows.

Similarly, you can also create a complete website with multiple pages and still add landing pages for specific campaigns.

What Do I Need to Make a Landing Page vs Website?

You’ll need a domain and a web hosting account to create a landing page or a website.

A domain name is the location of your website or landing page (e.g. wpbeginner.com). This is what your users will type in their browsers to view your landing page or website.

The web hosting account is where your landing page or website files will be stored.

Normally, a domain costs around $16 per year, and hosting plans start at $7.88 per month (usually paid annually). Now this is a significant amount if you are just starting out.

Luckily, our friends at Bluehost has agreed to offer a free domain name and a generous discount on hosting for WPBeginner users.

Basically, you can get started for just $2.75 per month.

→ Click Here to Claim This Exclusive Bluehost Offer ←

Bluehost is one of the biggest hosting companies in the world and an officially recommended WordPress hosting provider.

Once you have signed up for a hosting account, Bluehost will automatically install WordPress for you.

WordPres is the world’s best website builder and makes it super easy to create a website or make landing pages. Simply log in to your hosting account and then login to your WordPress account dashboard.
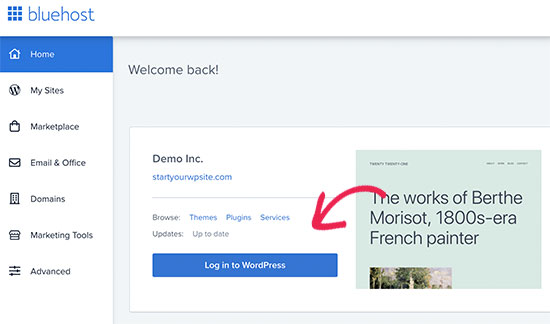
Log in to WordPress

How to Make a Landing Page for My Business

The easiest way to make a landing page is by using SeedProd. It is the best landing page builder on the market and allows you to easily create landing pages using a drag and drop interface and without writing any code.

First, you need to install and activate the SeedProd plugin. For more details, see our step by step guide on how to install a WordPress plugin.

Note: There is also a free version of SeedProd available that you can use to give it a try. However, you’ll need to upgrade to unlock all features and templates available in the premium version.

Upon activation, you need to enter your SeedProd license key. You can find this information under your account on the SeedProd website.
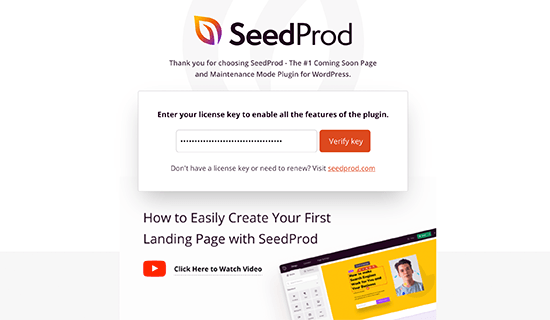
SeedProd license key

You can now start building your first landing page.

Simply head over to SeedProd » Pages page and click on the ‘Create new landing page’ button.
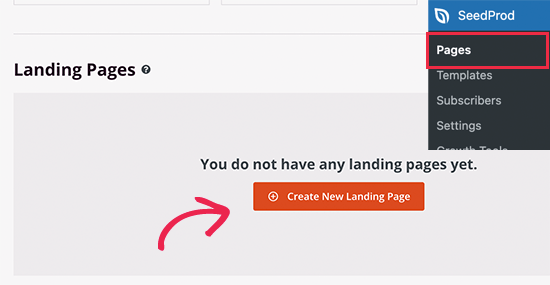
Creating a new landing page

Next, you will be asked to choose a template page as a starting point for your landing page. SeedProd comes with dozens of beautiful templates that you can completely modify or you can even start with a blank template.
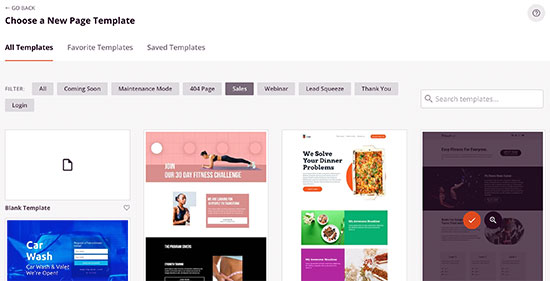
Choose a landing page template

This will bring up a popup asking you to provide a name for your landing page. Enter a name for your page and then click on the ‘Save and Start Editing the Page’ button.
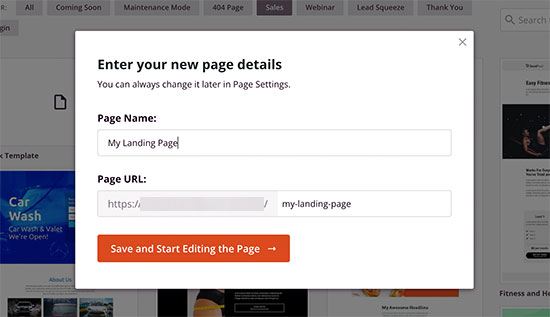
Name your landing page

SeedProd will now load the page builder interface with a live preview of your chosen template.
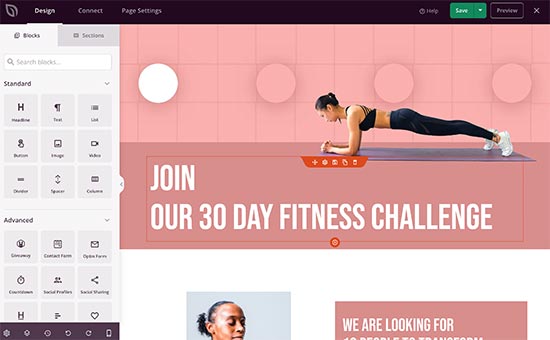
SeedProd page builder interface

You can simply point and click on any item in the live preview to edit it. You can also add new blocks from the left column to your page.

SeedProd comes with all commonly used elements as blocks. Each block has its own settings that you can adjust using a simple user interface.

It also includes blocks for WooCommerce and integrations for all popular email marketing services under the ‘Connect’ tab.
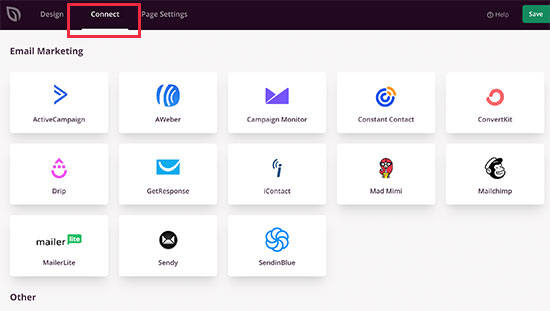
Integrations

Once you are satisfied with your landing page, you can click to save or publish your page to make it live.
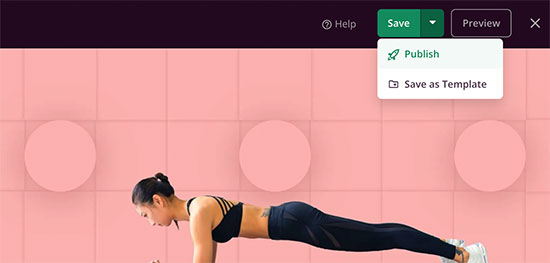
Publish landing page

Publishing Landing Page as Homepage for Your Domain

Now if you want to only display your landing page when someone enters your domain name, then you’ll need to set it up as your homepage in WordPress.

Simply go to Settings » Reading page. From here you need to select ‘A static page’ under ‘Your homepage displays’ option.
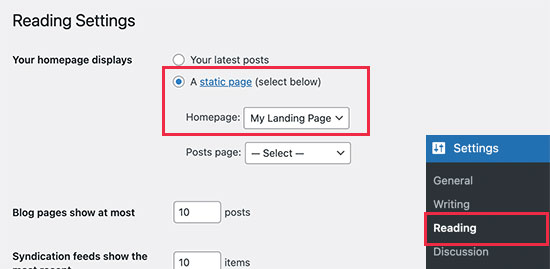
Set homepage

After that, go ahead and select the landing page you created earlier as your ‘Homepage’. Don’t forget to click on the Save changes button to update your settings.

Creating Landing Pages for Other Domain Names?

What if you wanted to create landing pages for other domain names? This comes in handy if you have multiple domains to cover different markets and regions.

SeedProd comes with built-in domain mapping support. This allows you to easily create a landing page in SeedProd and map it to any other domain name.
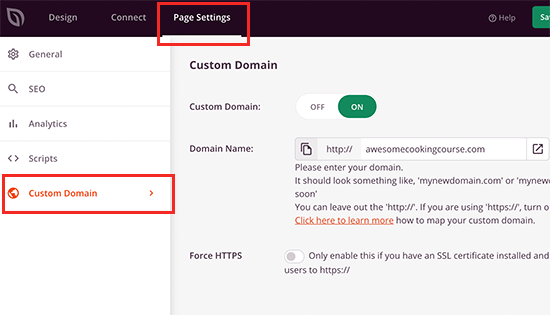
Set custom domain name

For more details, see our tutorial on how to easily add a custom domain for your landing page in WordPress.

How to Make a Complete Website for My Business

WordPress is the most powerful website builder used by millions of business websites, eCommerce stores, blogs, news and media sites.

Since you have already installed WordPress on your Bluehost account, you can simply login to your account dashboard and start working on your website.

First, you want to add new pages by visiting Pages » All Pages page and clicking on the Add New button.
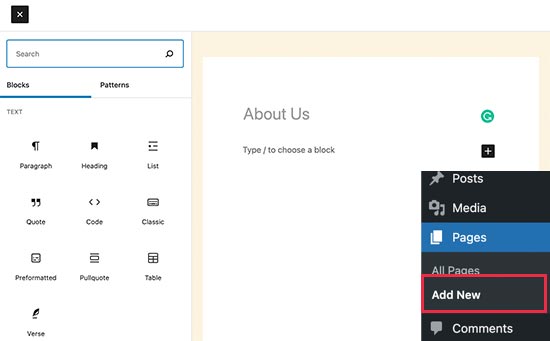
Adding new pages in WordPress

WordPress comes with a powerful editor that allows you to easily add design and content elements to your pages as blocks. To learn more, see our tutorial on how to use WordPress editor.

Tip: Need ideas for pages? See our list of the most important pages to create for a new WordPress website for some excellent ideas.

Next, you would want to choose a design for your website. WordPress comes with thousands of free and paid themes for all sorts of websites.

Bonus Tip: Need help choosing a theme, see our expert pick of the most popular WordPress themes or take a look at these great themes for business websites.

Once you have found a theme you want to use, you can go to Appearance » Themes page and click on the Add New button to install it.
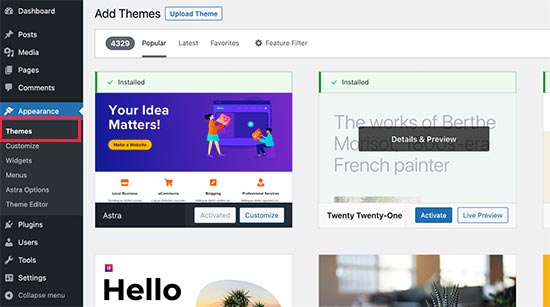
Install WordPress theme

See our tutorial on how to install a WordPress theme for detailed instructions.

The real power of WordPress comes from its plugins. These are like apps for your WordPress websites that you can install to extend its features. Start by checking out our pick of the essential WordPress plugins.

Need more help with your new website? See our detailed tutorial on how to make a website with step by step instructions.

We hope this article helped you learn the difference between landing page vs website. You may also want to see our guide on how to promote your business on a budget and our tips on quickly getting more traffic to your website.

If you liked this article, then please subscribe to our YouTube Channel for WordPress video tutorials. You can also find us on Twitter and Facebook.

The post What’s the Difference Between Landing page vs Website? appeared first on WPBeginner.


from WPBeginner https://ift.tt/3EU4q3p

How to Do Live Blogging in WordPress (Step by Step)

Do you want to learn how to do live blogging in WordPress?

Live blogging is a form of blogging that lets you cover live events and provide updates to your readers in real time.

In this article, we’ll show you how you can add live blogging to your WordPress site, step by step.

How to do live blogging in WordPress (step by step)

Why Do Live Blogging in WordPress?

Live blogging is when you create a single blog post and add real time updates during an event. This lets you add new content as the event unfolds, while keeping all the updates in a central place.

Bloggers and news sites commonly use it to broadcast real time updates from technology conferences, sports events, and across other blogging niches.

For example, if you run a crossfit gym you could provide real time live blogging coverage of the crossfit games.

Or, if you run a gaming website, you could provide real time blogging for eSports matches and other events.

Live blogging is a fun way to engage your readers and keep them coming back to your website for updates.

That being said, let’s show you how you can do live blogging on your WordPress site, step by step.

Install and Setup the Live Blogging Plugin

You could do live blogging in WordPress by manually editing a blog post every time you want to add an update.

However, if you live blog often, we recommend using the 24liveblog plugin. This free plugin lets you add real-time live blogging to your site easily.

24liveblog free plugin

24liveblog offers a forever-free plan that includes features like social media integration, real-time statistics, audio and video recording, and much more.

First thing you need to do is install and activate the 24liveblog plugin. For more details, see our beginner’s guide on how to install a WordPress plugin.

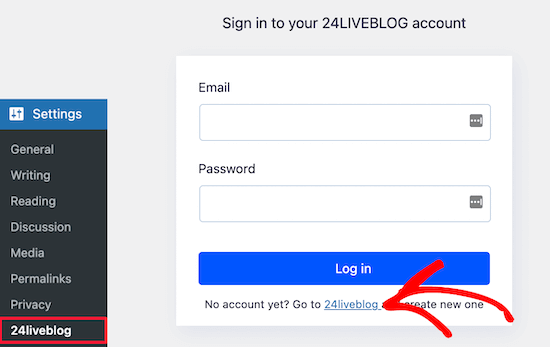
After that, navigate to Settings » 24liveblog and then click the ’24liveblog’ link at the bottom of the sign up box.

24liveblog plugin settings

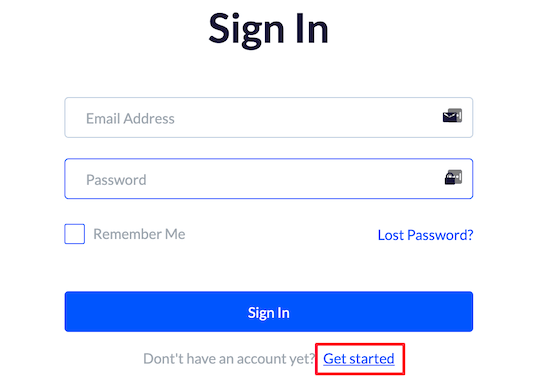
This brings you to the sign in page on 24liveblog’s website.

You need to click the ‘Get started’ link at the bottom of the screen to create an account.

Click get started link

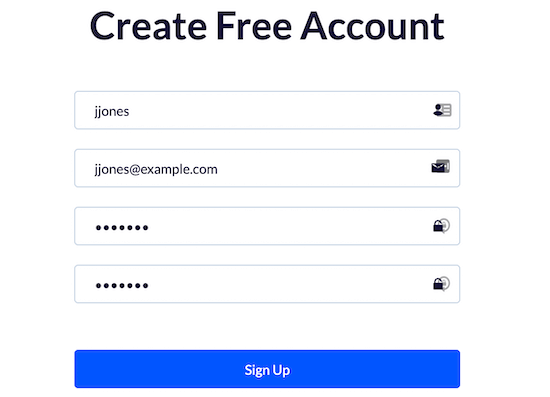
Next, you need to enter a user name, email address, and password.

Then, click the ‘Sign Up’ button.

Enter account information and sign up

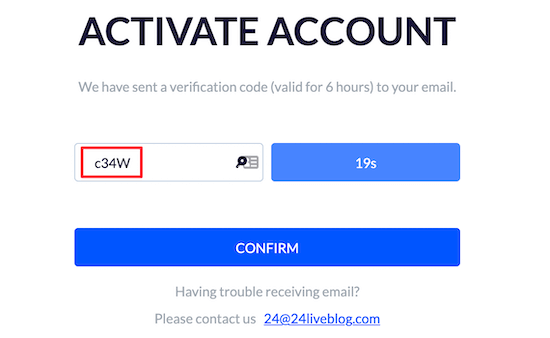
Once you’ve done that, you need to activate your account.

Simply enter the code from your email and then click the ‘Confirm’ button.

Activate 24liveblog account

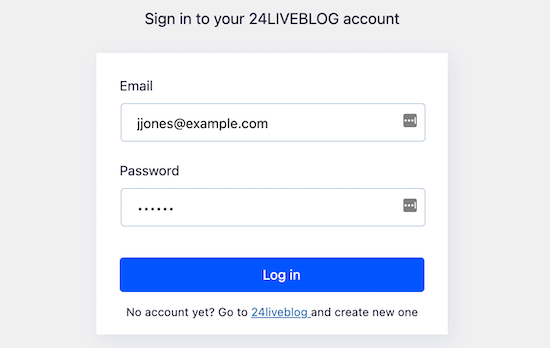
After that, you can go back to Settings » 24liveblog in your WordPress dashboard and enter your email and password.

Then, click the ‘Log in’ button.

Sign into 24liveblog account in WordPress

Now you’ve successfully connected your WordPress blog and the 24liveblog platform.

Add a New WordPress Blog Post for Live Blogging

Next, you need to create a blog post where you’ll embed your live blog.

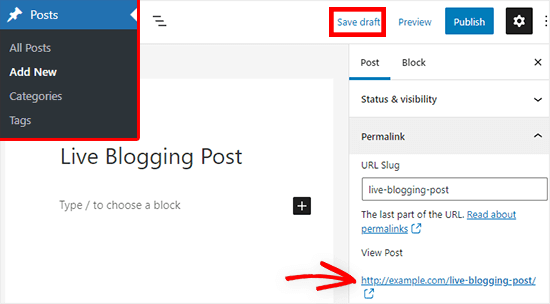
To do this, go to Posts » Add New and then enter the name of your blog post.

add new live blogging blog post

Click the ‘Save Draft’ link at the top right.

Then, under the Permalink tab in the right-hand menu, make note of the blog post URL. You’ll need to enter this later in your live blog event details.

Create Your First Live Blog Event

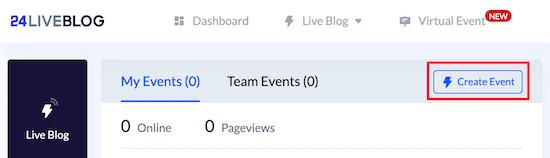
Now head over to your account page on the 24liveblog website and click the ‘Create Event’ button.

Create new 24liveblog event

This brings you to a screen where you can choose the type of event.

Simply click on the ‘Live Blog’ box.

Select live blog event

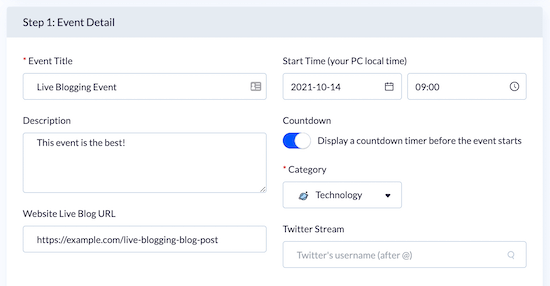
Here you can enter your event details.

You need to give your event a title, select the time, and choose a category.

Enter event details

You can also add a description for your event and enter the URL for the blog post you created earlier.

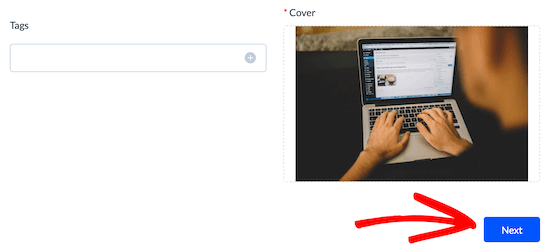
Then, add a cover image for the event and click the ‘Next’ button.

Add event cover image and click next

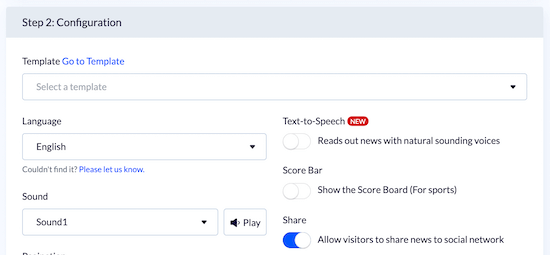
On the next screen, you’ll find all kinds of options for visitor interaction.

For example, you can enable a countdown timer, real time sports score updates, and more.

You can choose to customize these as you like to suit your event, and then click the ‘Next’ button to continue.

Configure additional event display settings

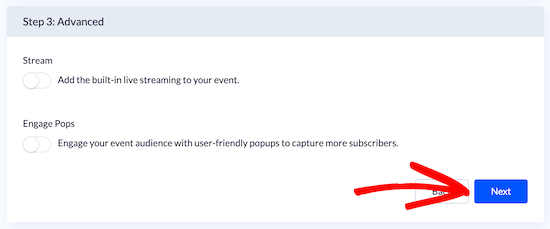
On the next screen, you can choose to turn on live streaming and popups to grow your email list, but we’ll leave the default settings.

Then, click the ‘Next’ button at the bottom.

Advanced live blog settings

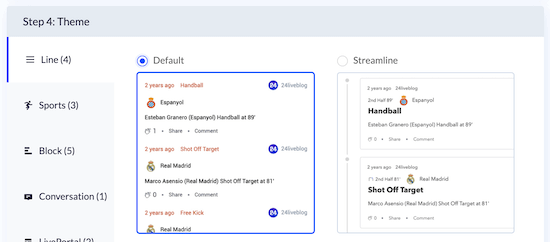
After that, you can choose a theme. This changes the style of your live blogging stream on your website.

We’ll use the ‘Default’ time. However, you can choose the theme that works best with your event.

To choose a new theme, all you have to do is click on it.

Select live blogging theme

Then, click the ‘Next’ button at the bottom of the page. On the next screen, simply click ‘Next’ one more time.

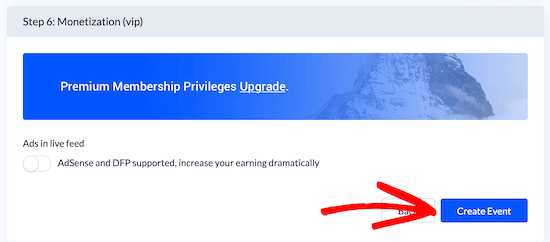
After that, you’ll be taken to the final screen, where you need to click the ‘Create Event’ button.

Finalize event creation

Add the Live Blogging Feature to Your WordPress Blog Post

Now, you need to add the 24liveblog block to the blog post you created earlier.

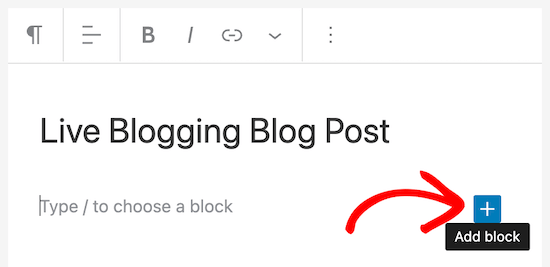
Simply open up the blog post, then click the ‘Plus’ add block button.

Add new block for live blogging

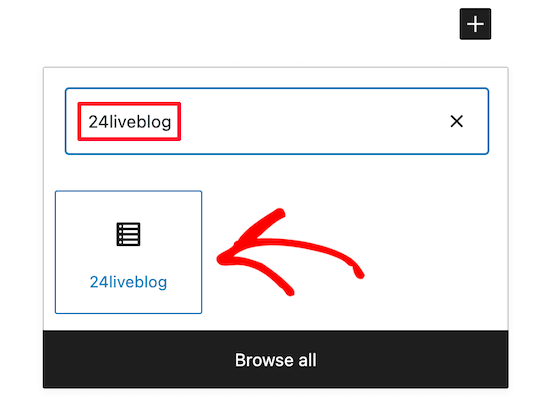
Next, type ’24liveblog’ into the search bar.

Then, click the ’24liveblog’ block.

Select 24liveblog block

This will automatically add live blogging functionality into your blog post.

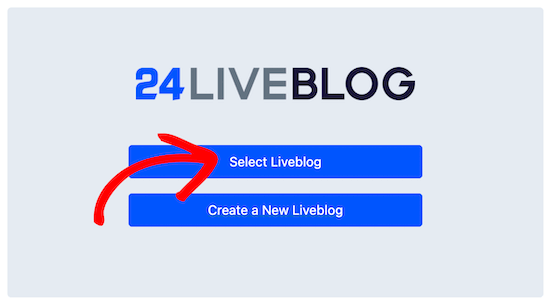
After that, click the ‘Select Liveblog’ button.

Select liveblog event

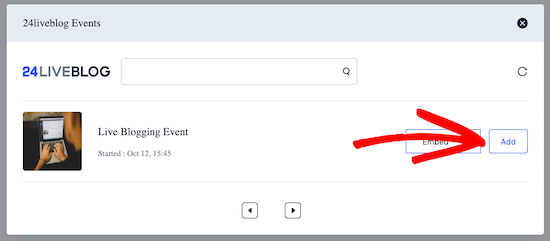
This brings up a popup that will list all of the events you have created.

Simply find your event and then click the ‘Add’ button.

Add liveblogging event

You can continue to add more text and other elements to your post.

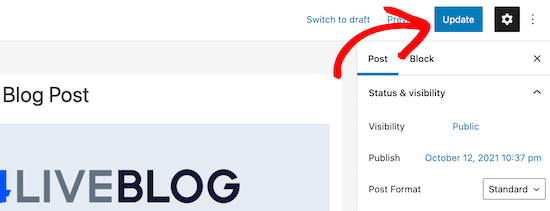
Once you’re finished, click the ‘Update’ or ‘Publish’ button to make your post live.

Update live blog post

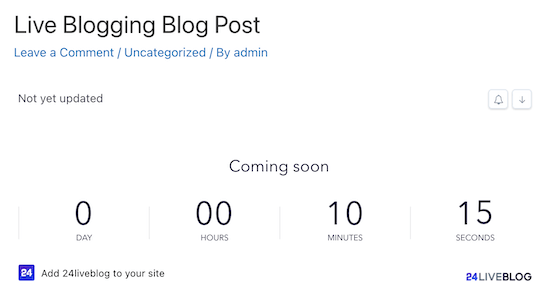
You can view your post even when the live blogging event hasn’t started.

If you enabled a countdown timer when setting up your event, then you’ll see the timer now.

Countdown timer example

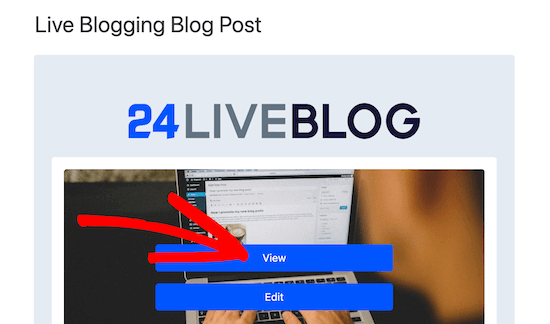
When it’s time for your event to begin, simply open up your blog post in your post editor.

Then, click the ‘View’ button.

Click view to start live blogging

This will take you to your account on the 24liveblog website.

Here you can blog in real time, and your content will automatically be added to the live blogging post on your website.

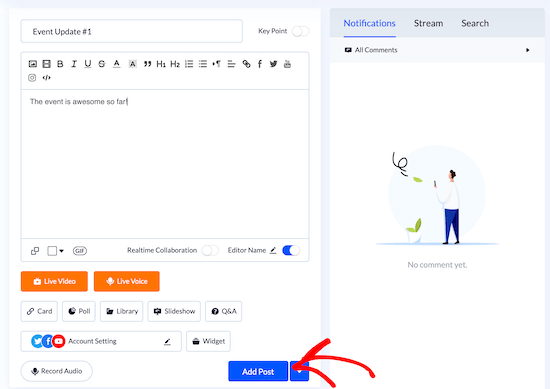
Simply enter your post content and then click the ‘Add Post’ button.

Publish new post update

You can also record live audio and add video and images to your post.

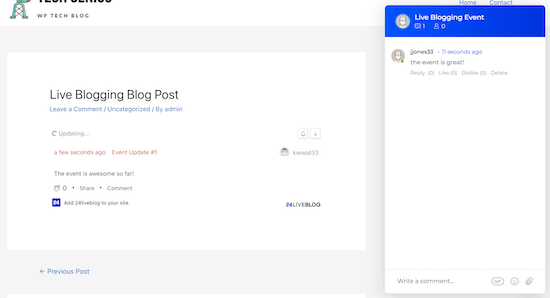
Your visitors can comment on each event update you publish and also chat with each other in the live chat window.

Live blogging example

If you want to add an events calendar to your site that shows all of the live blogging events you’re hosting, then see our guide on how to create a simple event calendar with Sugar Calendar.

We hope this article helped you learn how to do live blogging in WordPress. You may also want to see our guide on how to get a free email domain and our comparison of the best AI chatbots software for your website.

If you liked this article, then please subscribe to our YouTube Channel for WordPress video tutorials. You can also find us on Twitter and Facebook.

The post How to Do Live Blogging in WordPress (Step by Step) appeared first on WPBeginner.


from WPBeginner https://ift.tt/3EytX1J

How to Set oEmbed Max Width in WordPress (4 Easy Methods)

Do you want to limit the width of oEmbeds in WordPress?

WordPress automatically embeds third-party content like YouTube videos, Tweets, or Facebook posts. However, sometimes the embeds may get too wide and mess up your page layouts.

In this article, we’ll show you how to set oEmbed max-width in WordPress so you can have more control over your site layout.

Setting oEmbed maximum width in WordPress

Why Fix the OEmbed Maximum Width in WordPress?

WordPress allows you to automatically embed content from select third-party websites into your posts and pages using a technology called oEmbed.

This allows you to easily embed YouTube videos, Facebook posts, tweets, and many other types of content on your website. This content is not hosted on your WordPress website. Instead, it’s displayed directly from these third-party sites.

WordPress is quite good at automatically adjusting the width of the embedded content to your website’s content or sidebar areas.

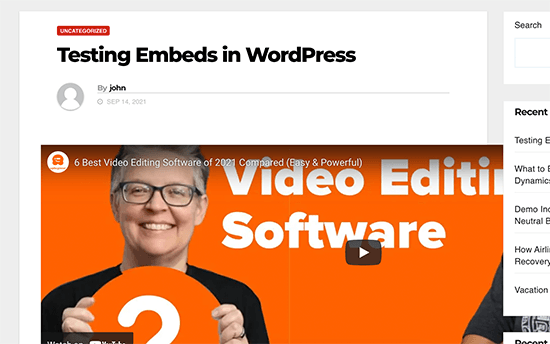
However, sometimes these embedded content may be too wide and overlap your website’s content areas, like in the example below.

A WordPress embed overflowing the content width

To fix this, you’ll need to explicitly tell WordPress to use a maximum width limit for third-party embeds. Unfortunately, there is no option in WordPress settings to do that.

That being said, let’s take a look at how to easily set oEmbed max width in WordPress without breaking anything.

We’ll cover 4 different methods, and you can choose the one that best suits your needs:

  1. Set oEmbed width with WordPress shortcode
  2. Set oEmbed width with WordPress Embed Block
  3. Set oEmbed max width with CSS
  4. Set oEmbed max width with WordPress filter (Code Method)

Method 1. Use the Embed Shortcode in WordPress

This method is easier and works really well for setting a max width for video embeds in WordPress.

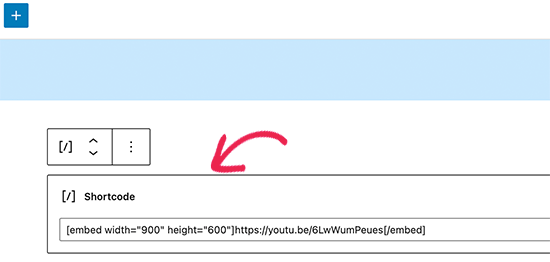
Instead of pasting the URL or using the YouTube block, you’ll use the shortcode block. Inside it, you need to use the embed shortcode and include width and height parameters.

[embed width="900" height="600"]https://youtu.be/6LwWumPeues[/embed]

Feel free to change the values of the width and height to your own requirements, and replace the embed URL to your own embed.

Embed shortcode width

You can now preview your post or page and see the embed in action.

oEmbed width adjusted

The embed shortcode and its width and height parameters don’t work for all oEmbed providers. For instance, you cannot use it to set the height and width of a Giphy embed in WordPress.

In that case, you can try one of the alternative methods mentioned below.

Method 2. Use Embed Blocks in WordPress

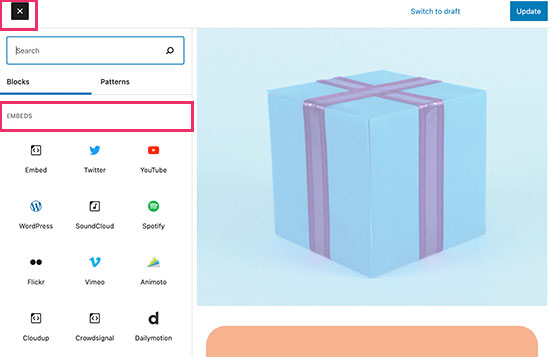
The default WordPress editor comes with several embed blocks for different oEmbed service providers. You can use them to embed content in different areas of your posts and pages.

Embed blocks in WordPress

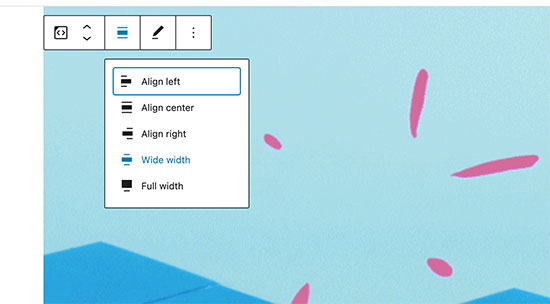
Some of these blocks also allow you to change the alignment of the embed and set the content width to wide or full width.

Block width and alignment

You can try using these options to see if it fixes the maximum width issue for the embed.

Method 3. Use CSS to Set Max Width for Embeds in WordPress

By default, WordPress automatically adds CSS classes to different areas of your posts and pages.

It also adds several CSS classes to embed blocks. These CSS classes can be used to set a maximum width for embeds on your WordPress website.

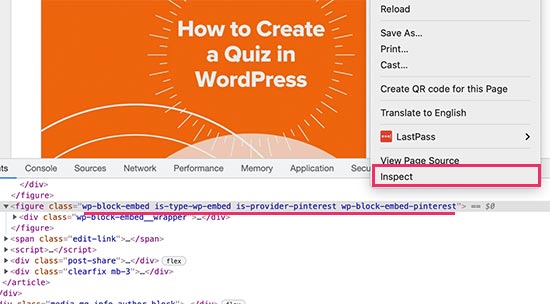
To find out which CSS classes you need to target, simply embed content in a post or page, and then preview it in your browser. Right-click by taking the mouse over to the embedded content and then select the Inspect tool.

Finding CSS classes for embed blocks

You’ll be able to see all the CSS classes added to the embedded element. You can use these classes to set a maximum width for this type of embed.

For instance, if you wanted to set a maximum width for all embeds, then you can use the following custom CSS.

.wp-block-embed {
    max-width: 900px!important;
}

You can also target specific oEmbed providers by using the .wp-block-embed-providername class. For instance, if you wanted to set a maximum width for only Pinterest embeds, then you can use the following custom CSS.

.wp-block-embed-pinterest {
    max-width: 900px!important;
}

Method 4. Set oEmbed Max Width Using WordPress Filter

This last method requires you to add custom code to your WordPress website. If you haven’t done this before, then take a look at our guide on how to easily add custom code snippets in WordPress.

For this method, we will add our own code into WordPress to set the default width for oEmbeds. Simply add the following code to your theme’s functions.php file or the Code Snippets plugin.

add_filter( 'embed_defaults', 'wpbeginner_embed_defaults' );
 
function wpbeginner_embed_defaults() {
    return array(
        'width'  => 400, 
        'height' => 280
    );
}

Don’t forget to adjust the height and width attributes to your own requirement.

The problem with this method is that it only applies the width attribute if the embedded content doesn’t have ‘width’ defined. If the embed code already includes width, then this method may not work.

Bonus Tip

If you regularly embed content from social media platforms to your WordPress website, then you should start using Smash Balloon.

Smash Balloon

It is the best social media plugin for WordPress and allows you to easily embed custom social media feeds in WordPress.

It supports popular social media embeds like YouTube, Twitter, and more. It also allows you to embed Facebook and Instagram content, which is not supported by WordPress.

More importantly, all social media feeds are mobile responsive and work with any WordPress theme.

We hope this article helped you learn how to set an oEmbed max width in WordPress. You may also want to see our complete social media cheat sheet or our expert comparison of the best live chat software for small business.

If you liked this article, then please subscribe to our YouTube Channel for WordPress video tutorials. You can also find us on Twitter and Facebook.

The post How to Set oEmbed Max Width in WordPress (4 Easy Methods) appeared first on WPBeginner.


from WPBeginner https://ift.tt/3Cxe1we

Pages